If you’re a fan of waffles but dread the hassle of complicated recipes, you’re in for a treat. The Bisquick waffle recipe is your ultimate shortcut to fluffy, crispy, golden waffles with minimal effort. Whether it’s a lazy Sunday morning or a quick weekday breakfast, Bisquick waffles are the perfect go-to. They’re easy to whip up, require simple ingredients, and deliver that irresistible homemade taste without the fuss.
In this guide, we’ll cover everything you need to know about making Bisquick waffles—from the classic recipe to creative variations like gluten-free, vegan, and savory options. You’ll also find tips for achieving the perfect texture, common mistakes to avoid, and serving suggestions to take your waffle game to the next level.
Let’s dive in and prepare to make the best Bisquick waffles you’ve ever tasted!
Table of Contents
What Is Bisquick?
History of Bisquick
Bisquick is more than just a baking mix—it’s a culinary icon that has made breakfasts easier since the 1930s. Created by General Mills, Bisquick was initially designed as a quick-fix solution for making biscuits. However, its versatility soon became apparent, and it found its way into recipes for pancakes, waffles, dumplings, and even casseroles.
The magic of Bisquick lies in its blend of flour, shortening, salt, and baking powder. This combination means you don’t have to measure and mix these ingredients separately, saving time and ensuring consistent results every time you cook.
Why Use Bisquick for Waffles?
So, why is Bisquick such a hit for waffle recipes? The answer is simple: convenience and reliability.
- Time-Saving: With Bisquick, you eliminate the need to measure multiple dry ingredients. Just add a few wet ingredients, and you’re ready to go—just like in this easy pancake recipe without baking powder.
- Consistent Results: Bisquick’s pre-measured ingredients ensure your waffles are perfectly fluffy and golden every time. Want to boost fluffiness? Learn what adding an egg to waffle mix does.
- Versatility: You can easily tweak the basic Bisquick waffle recipe to suit your taste—add fruits, spices, or even savory ingredients without worrying about the batter’s balance. Curious about swapping ingredients? Discover if you can use milk instead of water with waffle mix.
Whether you’re a busy parent trying to get breakfast on the table quickly or a foodie experimenting with flavors, Bisquick is your secret weapon for delicious waffles.
Delicious vegan Bisquick waffles with wholesome toppings.
Essential Ingredients for Bisquick Waffles
The Core Ingredients
The beauty of the Bisquick waffle recipe lies in its simplicity. You only need a handful of ingredients to create mouthwatering waffles:
- 2 cups Bisquick mix – This is the show’s star, providing the perfect base.
- 1 1/3 cups milk – Whole milk works best for richness, but you can use any milk you prefer.
- 1 egg – This helps bind the batter and adds fluffiness.
- 2 tablespoons vegetable oil or melted butter adds moisture and crispness to the waffles.
That’s it! With these essential ingredients, you’re just a few steps away from waffle perfection.
Optional Add-ins for Flavor Variety
Want to jazz up your waffles? Here are some great additions to think about:
- Vanilla Extract: Adds a warm, sweet aroma. (1 teaspoon)
- Cinnamon or Nutmeg: For a cozy, spiced flavor. (½ teaspoon)
- Chocolate Chips: A favorite for kids and chocolate lovers alike. (½ cup)
- Berries: Fresh or frozen blueberries, raspberries, or chopped strawberries work great. (½ cup)
- Nuts: Chopped pecans, walnuts, or almonds for added crunch. (¼ cup)
These simple tweaks can transform your Bisquick waffles from classic to gourmet without much extra effort.
Step-by-Step Bisquick Waffle Recipe
Preparation Time and Serving Size
- Prep Time: 5 minutes
- Cook Time: 5 minutes per batch
- Total Time: 10–15 minutes
- Servings: Makes four large waffles
Instructions for Perfect Bisquick Waffles

- Preheat Your Waffle Iron:
- Start by heating your waffle iron. A properly preheated iron ensures even cooking and that signature golden crisp.
- Mix the Batter:
- In a large bowl, combine 2 cups of Bisquick mix, 1 1/3 cups of milk, one egg, and two tablespoons of oil or melted butter. Stir just until blended. Don’t overmix—lumps are okay! Overmixing can make the waffles challenging.
- Grease the Waffle Iron:
- Lightly brush the waffle plates with oil or spray with non-stick cooking spray to prevent sticking.
- Pour the Batter:
- Pour the batter onto the center of the waffle iron, using about ¾ cup for a standard waffle maker. The batter will spread as you close the lid.
- Cook Until Golden Brown:
- Close the lid and cook for 4–5 minutes or until the waffles are golden brown and crispy. The exact time can vary dependent on the type of waffle iron you have.
- Serve Hot:
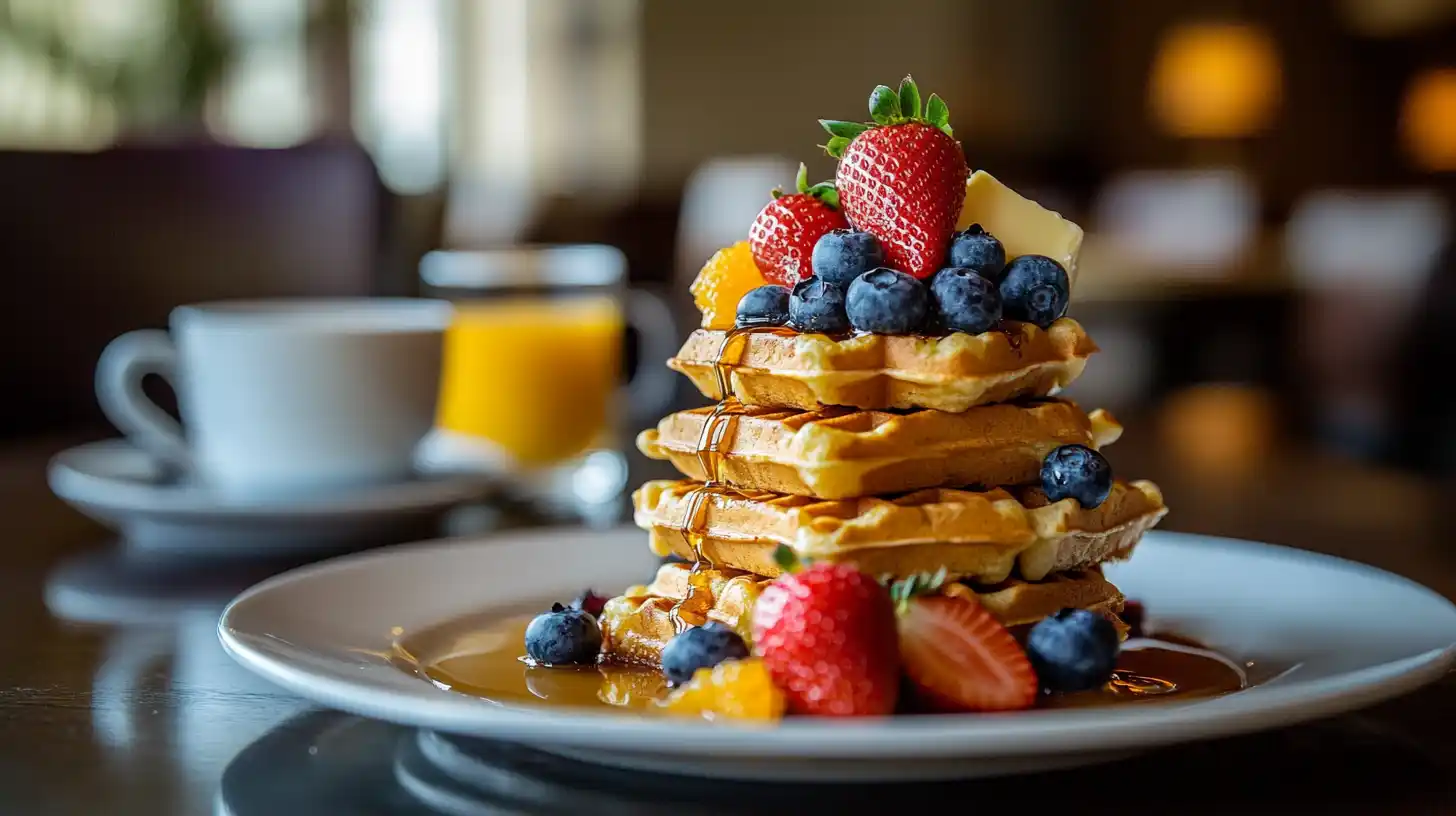
- Carefully remove the waffles and serve immediately with your favorite toppings, such as syrup, whipped cream, fresh fruit, or even a dusting of powdered sugar.
Tips for Making Fluffy and Crispy Waffles
The hallmark of great waffles is the perfect balance of a crispy exterior and a fluffy interior. While the Bisquick waffle recipe is already designed to be foolproof, a few extra tips can take your waffles from good to extraordinary.
Adjusting Batter Consistency
The texture of your batter plays a significant role in the outcome of your waffles.
- Thicker Batter = Fluffier Waffles: Reduce the milk slightly if you prefer thicker, fluffier waffles. A thicker batter rises more during cooking, creating a soft and pillowy texture.
- Thinner Batter = Crispier Waffles: For waffles with extra crispiness, add a splash of more milk. A thinner batter spreads more in the waffle iron, creating thinner, crunchier edges.
Pro Tip: Let the batter rest for 5–10 minutes before cooking. This hydrates the flour, leading to a smoother, fluffier waffle.
Cooking Techniques for the Perfect Texture
- Preheat Thoroughly: Always ensure your waffle iron is fully preheated before adding the batter. A hot iron helps the waffles cook evenly and develop that golden, crispy crust.
- Don’t Peek Too Soon: Resist the urge to open the waffle iron early. Doing so can cause the waffle to tear apart or become unevenly cooked. Wait until the steam reduces significantly—usually a good sign that the waffle is done.
- Use Oil Instead of Butter for Crispiness: While butter adds rich flavor, oil creates a crisper texture. You can experiment with both to find your ideal balance.
Common Mistakes to Avoid When Making Waffles
Small mistakes can affect your waffles’ texture and taste, even with a simple recipe like this. Here’s what to watch out for:
Overmixing the Batter
One of the biggest waffle-making mistakes is overmixing the batter. When you stir too much, you develop the gluten in the flour, leading to dense, chewy waffles instead of light and fluffy ones. Remember, a few lumps are perfectly fine—they’ll disappear during cooking.
Incorrect Waffle Iron Usage
- Not Preheating Properly: A cold waffle iron results in uneven cooking and pale waffles. Always preheat until the indicator light (if your iron has one) signals readiness.
- Skipping the Non-Stick Spray: Even if your waffle iron claims to be non-stick, it’s a good idea to grease it before each batch to prevent sticking lightly.
Pouring Too Much Batter
Adding too much batter can cause it to spill over the edges, creating a mess and uneven cooking. Stick to the recommended ¾ cup per waffle (or adjust based on your waffle iron’s size).
Variations of the Classic Bisquick Waffle Recipe
While the classic Bisquick waffle is delicious, experimenting with different flavors and add-ins can keep breakfast exciting. Here are some delicious variations to test:
Buttermilk Bisquick Waffles
For a richer flavor and tender texture, swap regular milk with buttermilk.
Ingredients:
- 2 cups Bisquick mix
- 1 ¼ cups buttermilk
- 1 egg
- 2 tablespoons melted butter
Instructions:
Follow the same preparation steps as the classic recipe. The buttermilk adds a slight tanginess and makes the waffles incredibly tender.
Chocolate Chip Bisquick Waffles
Perfect for kids (and kids at heart), chocolate chip waffles are a sweet treat any time of day.
How to Make:
Fold ½ cup of mini chocolate chips into the batter before cooking. For an extra indulgent touch, sprinkle a few more chips on top right after removing them from the waffle iron.
Savory Bisquick Waffles
Waffles aren’t just for sweet breakfasts—they also make an excellent savory dish!
Savory Add-ins:
- Shredded cheese (cheddar, parmesan)
- Chopped herbs (chives, parsley)
- Cooked, crumbled bacon or sausage
- Diced jalapeños for a spicy kick
These savory waffles are perfect for serving with fried chicken or gravy or as a base for a breakfast sandwich.
Gluten-Free Bisquick Waffle Recipe
Bisquick offers a gluten-free version of their mix, making it easy to enjoy delicious waffles even if you’re gluten-sensitive.
Ingredients and Adjustments
- 2 cups Gluten-Free Bisquick mix
- 1 1/3 cups milk (dairy or non-dairy)
- 1 egg
- 2 tablespoons vegetable oil
Preparation Method
The method is the same as the classic recipe:
- Mix all ingredients until just combined.
- Pour onto a preheated waffle iron.
- Cook until golden brown.
Tip: Gluten-free waffles can be more delicate, so handle them gently when removing from the waffle iron.
Want to jazz up your waffles? Here are some great additions to think about:
- Vanilla Extract: Adds a warm, sweet aroma. (1 teaspoon)
- Cinnamon or Nutmeg: For a cozy, spiced flavor. (½ teaspoon)
- Chocolate Chips: A favorite for kids and chocolate lovers alike. (½ cup)
- Berries: Fresh or frozen blueberries, raspberries, or chopped strawberries work great. (½ cup)
- Nuts: Chopped pecans, walnuts, or almonds for added crunch. (¼ cup)
These simple tweaks can transform your Bisquick waffles from classic to gourmet without much extra effort.
Step-by-Step Bisquick Waffle Recipe
Preparation Time and Serving Size
- Prep Time: 5 minutes
- Cook Time: 5 minutes per batch
- Total Time: 10–15 minutes
- Servings: Makes four large waffles
Instructions for Perfect Bisquick Waffles
- Preheat Your Waffle Iron:
- Start by heating your waffle iron. A properly preheated iron ensures even cooking and that signature golden crisp.
- Mix the Batter:
- In a large bowl, combine 2 cups of Bisquick mix, 1 1/3 cups of milk, one egg, and two tablespoons of oil or melted butter. Stir just until blended. Don’t overmix—lumps are okay! Overmixing can make the waffles challenging.
- Grease the Waffle Iron:
- Lightly brush the waffle plates with oil or spray with non-stick cooking spray to prevent sticking.
- Pour the Batter:
- Pour the batter onto the center of the waffle iron, using about ¾ cup for a standard waffle maker. The batter will spread as you close the lid.
- Cook Until Golden Brown:
- Close the lid and cook for 4–5 minutes or until the waffles are golden brown and crispy. The exact time can vary dependent on the type of waffle iron you have.
- Serve Hot:
- Carefully remove the waffles and serve immediately with your favorite toppings, such as syrup, whipped cream, fresh fruit, or even a dusting of powdered sugar.
Tips for Making Fluffy and Crispy Waffles
The hallmark of great waffles is the perfect balance of a crispy exterior and a fluffy interior. While the Bisquick waffle recipe is already designed to be foolproof, a few extra tips can take your waffles from good to extraordinary.
Adjusting Batter Consistency
The texture of your batter plays a significant role in the outcome of your waffles.
- Thicker Batter = Fluffier Waffles: Reduce the milk slightly if you prefer thicker, fluffier waffles. A thicker batter rises more during cooking, creating a soft and pillowy texture.
- Thinner Batter = Crispier Waffles: For waffles with extra crispiness, add a splash of more milk. A thinner batter spreads more in the waffle iron, creating thinner, crunchier edges.
Pro Tip: Let the batter sit for 5-10 minutes prior to making it for cooking. This hydrates the flour, leading to a smoother, fluffier waffle.
Cooking Techniques for the Perfect Texture
- Preheat Thoroughly: Always ensure your waffle iron is fully preheated before adding the batter. A hot iron helps the waffles cook evenly and develop that golden, crispy crust.
- Don’t Peek Too Soon: Resist the urge to open the waffle iron early. Doing so can cause the waffle to tear apart or become unevenly cooked. Wait until the steam reduces significantly—usually a good sign that the waffle is done.
- Use Oil Instead of Butter for Crispiness: While butter adds rich flavor, oil creates a crisper texture. You can experiment with both to find your ideal balance.
Common Mistakes to Avoid When Making Waffles
Small mistakes can affect your waffles’ texture and taste, even with a simple recipe like this. Here’s what to watch out for:
Overmixing the Batter
One of the biggest waffle-making mistakes is overmixing the batter. When you stir too much, you develop the gluten in the flour, leading to dense, chewy waffles instead of light and fluffy ones. Remember, a few lumps are perfectly fine—they’ll disappear during cooking.
Incorrect Waffle Iron Usage
- Not Preheating Properly: A cold waffle iron results in uneven cooking and pale waffles. Always preheat until the indicator light (if your iron has one) signals readiness.
- Skipping the Non-Stick Spray: Even if your waffle iron claims to be non-stick, it’s a good idea to grease it before each batch to prevent sticking lightly.
Pouring Too Much Batter
Adding too much batter can cause it to spill over the edges, creating a mess and uneven cooking. Stick to the recommended ¾ cup per waffle (or adjust based on your waffle iron’s size).
Variations of the Classic Bisquick Waffle Recipe
While the classic Bisquick waffle is delicious, experimenting with different flavors and add-ins can keep breakfast exciting. Here are some tasty variations to try:
Buttermilk Bisquick Waffles
For a richer flavor and tender texture, swap regular milk with buttermilk.
Ingredients:
- 2 cups Bisquick mix
- 1 ¼ cups buttermilk
- 1 egg
- 2 tablespoons melted butter
Instructions:
Follow the same preparation steps as the classic recipe. The buttermilk adds a slight tanginess and makes the waffles incredibly tender.
Chocolate Chip Bisquick Waffles
Perfect for kids (and kids at heart), chocolate chip waffles are a sweet treat any time of day.
How to Make:
Fold ½ cup of mini chocolate chips into the batter before cooking. For an extra indulgent touch, sprinkle a few more chips on top right after removing them from the waffle iron.
Savory Bisquick Waffles
Waffles aren’t just for sweet breakfasts—they also make an excellent savory dish!
Savory Add-ins:
- Shredded cheese (cheddar, parmesan)
- Chopped herbs (chives, parsley)
- Cooked, crumbled bacon or sausage
- Diced jalapeños for a spicy kick
These savory waffles are perfect for serving with fried chicken or gravy or as a base for a breakfast sandwich.
Gluten-Free Bisquick Waffle Recipe
Bisquick offers a gluten-free version of their mix, making it easy to enjoy delicious waffles even if you’re gluten-sensitive.
Ingredients and Adjustments
- 2 cups Gluten-Free Bisquick mix
- 1 1/3 cups milk (dairy or non-dairy)
- 1 egg
- 2 tablespoons vegetable oil
Preparation Method
The method is the same as the classic recipe:
- Mix all ingredients until just combined.
- Pour onto a preheated waffle iron.
- Cook until golden brown.
Tip: Gluten-free waffles can be more delicate, so handle them gently when removing from the waffle iron.
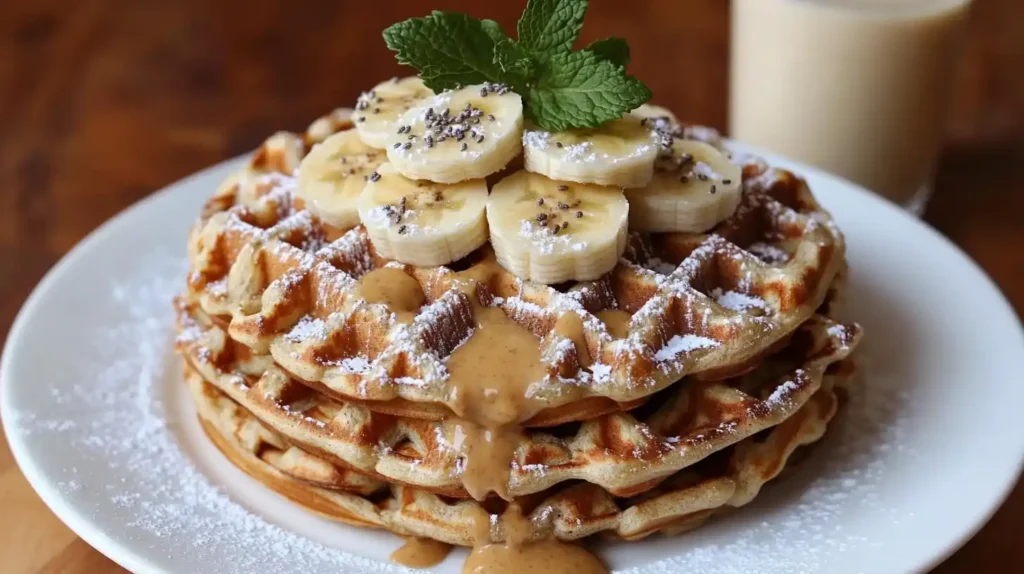
Vegan Bisquick Waffle Recipe
You don’t have to miss out on delicious waffles because you’re following a plant-based diet. The beauty of the Bisquick waffle recipe is its flexibility—you can easily tweak it to create light, fluffy, and completely vegan waffles!
Substitutes for Eggs and Dairy
To make Bisquick waffles vegan, you must replace the eggs and dairy milk with plant-based alternatives. Here’s how:
- Egg Substitute: Use any of the following per egg required: Flax Egg: 1 tablespoon ground flaxseed mixed with three tablespoons water (let sit for 5 minutes to thicken).
- Chia Egg: Same as the flax egg, but with chia seeds instead.
- Mashed Banana: ¼ cup mashed ripe banana adds moisture and a slight banana flavor.
- Applesauce: ¼ cup unsweetened applesauce works excellent for binding.
- Milk Substitute: Use any plant-based milk, such as Almond milk
- Soy milk
- Oat milk
- Coconut milk (for a richer flavor)
Vegan Bisquick Waffle Recipe
Ingredients:
- 2 cups Bisquick (the original mix is vegan-friendly, but always double-check the label)
- 1 1/3 cups plant-based milk (almond, soy, oat, etc.)
- 1. Flax eggs (1 1 tbsp ground flaxseed and 3 tablespoons water)
- 2 tablespoons vegetable oil, or coconut oil melted.
Instructions:
- Preheat your waffle iron.
- In a small bowl, prepare the flax egg and let it sit for 5 minutes.
- Combine the Bisquick mix, plant-based milk, flax egg, and oil in a large bowl. Stir until just combined—don’t overmix.
- Make sure to lightly grease your waffle iron. Then, add the batter.
- Cook until golden brown and crispy.
- Serve with maple syrup, fresh fruit, or your favorite vegan toppings.
These vegan waffles are as fluffy and satisfying as the original, with a crispy outside and tender inside.
Serving Suggestions for Bisquick Waffles
Waffles are like a blank canvas—you can dress them up however you like! Whether you prefer sweet, savory, or a little bit of both, here are some delicious ways to serve your Bisquick waffles.
Sweet Toppings
- Classic Maple Syrup: A timeless favorite. Warm maple syrup adds the perfect sweet finish.
- Fresh Berries: Strawberries, blueberries, raspberries, or blackberries bring freshness.
- Whipped Cream: Light, fluffy, and decadent—perfect with fruit or chocolate chip waffles.
- Powdered Sugar: A simple dusting adds an elegant touch.
- Nut Butter: Almond butter, peanut butter, or hazelnut spread adds richness and flavor.
- Honey or Agave Syrup: Great alternatives to maple syrup with unique flavors.
Savory Pairings
- Fried Chicken: The famous chicken and waffles combo is a must-try.
- Avocado and Poached Egg: For a healthy, savory breakfast or brunch option.
- Bacon or Sausage: Serve alongside or even crumble into the batter.
- Gravy: Perfect for savory waffles—try it with sausage gravy for a southern-style dish.
Mix and match sweet and savory flavors for the best of both worlds!
How to Store and Reheat Bisquick Waffles
One of the best things about waffles is that they store and reheat beautifully, making them perfect for meal prep.
Best Storage Practices
- Refrigerating: If you plan to eat them within a few days, store waffles in an airtight container or a ziplock bag in the refrigerator. They’ll be fresh for up to three days.
- Freezing: For extended storage, let the waffles cool completely, then stack them with parchment paper between each waffle to prevent sticking. Place your items into a freeze-safe bag container. They’ll last up to three months.
Reheating Tips for Maintaining Crispiness
To keep your waffles crispy when reheating:
- Toaster: This is the best method for quick reheating. Pop the waffle into the toaster on medium heat until it’s warm and crispy.
- Oven: Preheat the oven to 350°F (175°C). Place waffles directly on the oven rack or a baking sheet and bake for 5–10 minutes until heated through and crispy.
- Air Fryer: Heat at 350°F (175°C) for 3–5 minutes for ultra-crispy waffles.
Avoid microwaving unless you’re in a hurry—it makes waffles soggy.
Frequently Asked Questions (FAQs)
1. Can I make Bisquick waffles without eggs?
Yes! You can use egg substitutes like flax eggs, chia eggs, mashed bananas, or applesauce. They work perfectly and maintain a fluffy texture.
2. How do I make my waffles extra crispy?
To get extra crispy waffles, ensure your waffle iron is thoroughly preheated, don’t overcrowd the batter, and use oil instead of butter. Reheating waffles in a toaster can also help restore crispiness.
3. Can I use water instead of milk in Bisquick waffles?
You can use water, but this may result in less flavorful and rich waffles. If using water, consider adding a tablespoon of melted butter or oil for better results.
4. What is different between pancake batter and waffle batter?
While similar, waffle batter typically contains more fat (butter or oil) to create a crispier texture, while pancake batter is designed to be lighter and fluffier.
5. How do I prevent waffles from sticking to the iron?
Preheat your waffle iron and lightly grease it with oil or non-stick spray before adding the batter. Even non-stick waffle irons benefit from a light coating.
6. Can I make Bisquick waffle batter ahead of time?
It’s best to make the batter fresh, but if needed, you can refrigerate it for up to 24 hours. Please stir it carefully before using it, as it may thicken slightly.
Conclusion
Thanks to the Bisquick waffle recipe, making delicious, fluffy, and crispy waffles has never been easier. Whether you’re whipping up a quick weekday breakfast, hosting a weekend brunch, or indulging in a sweet (or savory) treat, Bisquick provides the perfect foundation for versatile and effortless waffle creations.
From the classic recipe to creative variations like gluten-free, vegan, and savory options, there’s a waffle style for everyone. Plus, with simple tips for achieving the perfect texture, common mistakes to avoid, and serving suggestions to elevate your meal, you’re now fully equipped to become a waffle master in your kitchen.